May 10 2023
Liferay Remote Applications with Angular Custom Elements

Rashesh Ved
Product ManagerIntroduction
Liferay DXP has traditionally offered a wide variety of extension mechanisms to extend and customize the platform. Most of these mechanisms require the deployment of custom-written code to be activated.
In this blog we will be using a HTML Custom Components built with angular as a new extension mechanism.
This example has been developed using the following framework / tools versions
1 ) Liferay 7.4
2) NPM 8.12.1
3) Node 16.15.1
4) Angular CLI: 14.0.1
Constructing A Custom Component Using Angular
Create Angular Sample Application
As a starting point we need to create a normal angular application, which will be converting it into a custom html component.
1) Install Angular CLI
npm install -g @angular/cli
2) Create new Angular project
ng new ng-greetings
3) Install the required node modules
npm install
4) Go inside greetings folder and enter following command to create a custom greet component
ng new greetings
Designing The Application
In order to sense the output of our example, let’s add a custom behavior to the application, in this example we will make it very simple.
1) Replace the code inside greet.component.ts with the following code:
import { AfterViewInit, Component, OnInit } from ‘@angular/core’;
@Component({
    selector: ‘app- greet’,
    templateUrl: ‘./greet.component.html’,
styleUrls: [‘./ greet.component.css’]
})
export class GreetComponent implements OnInit {
    constructor() { }
    ngOnInit(): void {
    }
    name: string = “Rashesh”;
    greet(): void {
        alert(“Hello ” + this.name);
    };
}
2) Replace the code inside greet.component.html with the following code:
Enter Your Name:Greet Me!
3) Replace the code inside app.component.html with the following code:
<div>
    <app-greet></app-greet>
</div><br />
Build as Custom Web Component / Custom HTML Element
Web Components is a suite of different technologies allowing you to create reusable custom elements — with their functionality encapsulated away from the rest of your code — and utilize them in your web apps.
Angular elements are Angular components packaged as custom elements (also called Web Components), a web standard for defining new HTML elements in a framework-agnostic way.
In order to build angular as a custom web component, we will need to follow the below steps
1) Install @angular/elements by executing the following:
ng add @angular/elements
2) Define the component(s) which we want to build as a custom web component ; for that replace the code in app.module.ts with the
following:
import { Injector, NgModule } from ‘@angular/core’;
import { BrowserModule } from ‘@angular/platform-browser’;
import { createCustomElement } from “@angular/elements”;
import { AppRoutingModule } from ‘./app-routing.module’;
import { AppComponent } from ‘./app.component’;
import { GreetComponent } from ‘./greet/greet.component’;
import { APP_BASE_HREF } from ‘@angular/common’;

@NgModule({
    declarations: [
        AppComponent,
        GreetComponent
    ],
    imports: [
        BrowserModule,
        AppRoutingModule
    ],
    providers: [{ provide: APP_BASE_HREF, useValue: “/”}],
    entryComponents: [GreetComponent],
    bootstrap: [AppComponent, GreetComponent]
})
export class AppModule {
    constructor(private injector: Injector) {

        const appElement = createCustomElement(GreetComponent, {

            injector: this.injector

        });

        customElements.define("ng-greet", appElement);
    }

}
If you look at the following line, you will notice that we have defined our html tag name, so you will be able to use your component by embedding
customElements.define(“ng-greet”, appElement);
Open angular.json and replace “outputHashing”: “all” with “outputHashing”: “none”
Create the script to build the custom element, create a file at your project root level and name it “build-custom-element.js”
Place the following code in “build-custom-element.js” (in bold)
const fs = require(‘fs - extra’);

const concat = require(‘concat’);

(async function build() {

    const files = [
        './dist/greetings/runtime.js',

        './dist/greetings/polyfills.js',

        './dist/greetings/main.js'
    ];

    await fs.ensureDir(‘angular - elements - build’);

    await concat(files, ‘angular - elements - build / angular - elements.js’);

    await fs.copy(‘./dist/greetings / styles.css’, ‘angular - elements - build / styles.css’);

})();
Install the required NPM modules (in bold)
npm i concat fs-extra –save-dev
In your package.json file, add the following line under scripts (in bold)
“build:ng-greet”: “ng build greetings && node build-custom-element.js”,
Execute the following command to build your custom element (in bold)
npm run build:ng-greet
Congratulations! You have implemented and built your angular web component, this component can be used anywhere by adding the generated
javascript file and css,
this will allow you to use the custom component in any plain html page or any other places like Liferay. Create Liferay Remote Application
Liferay 7.4 has been empowered with a new extension mechanism by adding custom web components using Liferay Remote Applications,
please follow the below instructions in order to add the Greetings Component we have just created:
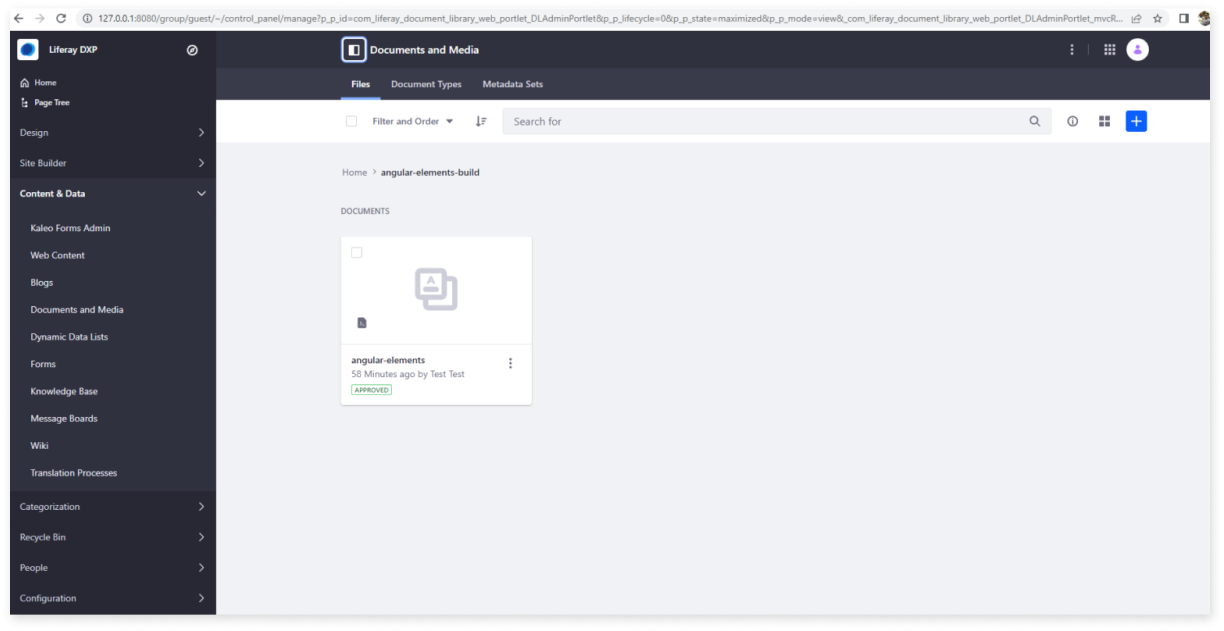
1) Navigate to Liferay -> Content and Data -> Documents and Media and create a folder to host our web component files.
2) Copy the files in your angular project folder -> angular-elements-build
angular-elements.js
greetings-image-1
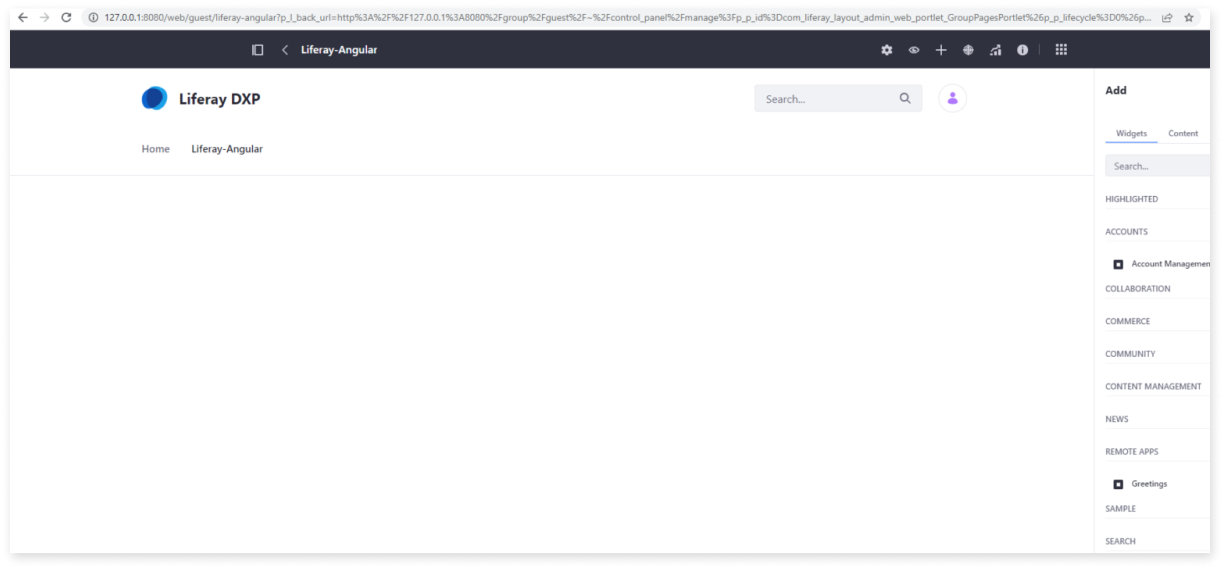
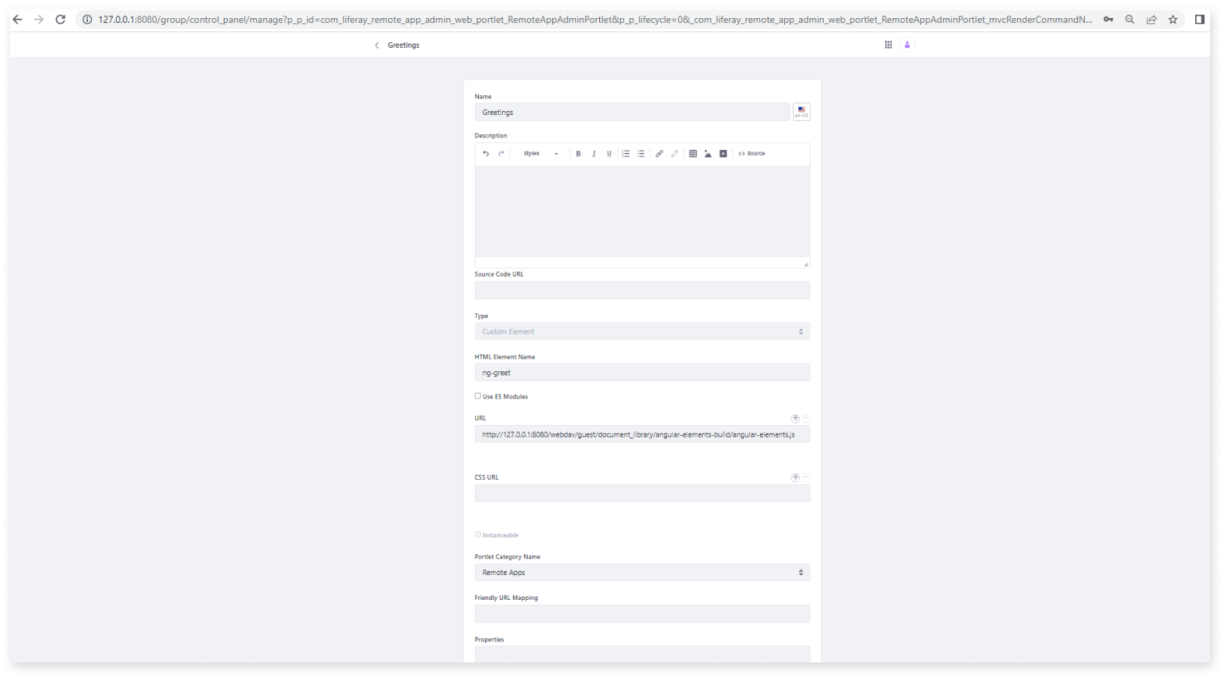
3) Navigate to Liferay -> Global Menu -> Applications -> Custom Apps -> Remote Apps
4) Create New Remote App
5) In the type filed, select “Custom Element”
6) In the HTML Element Name type “Greetings”
7) In the URL enter the angular-elements.js full url from liferay file information panel.
8) Save the application
You can now use your ng-greet in any liferay page by drag and drop it from the page editor tool box under Widgets -> Remote Apps.